Generic Maintenance Schedule - What sort of maintenance to perform at 3 months, 6 months, 1 year, etc.

Honda scooter info center - Honda maintenance schedules and general info

Yamaha scooter info center - Yamaha maintenance schedules and general info

The maintenance work is ranked by level of difficulty:

  Easy - Requires little knowledge of your scooter and few (if any) tools

  Medium - Requires some mechanical knowledge and a decent selection of tools

  Difficult - Requires in-depth knowledge and specialized tools

In all cases, it would really help to have the service manual for your scooter.

Easy Maintenance Work

Moderately Difficult Maintenance Work

Difficult Maintenance Work

Individual maintenance tasks

Flywheel (rotor) disassembly

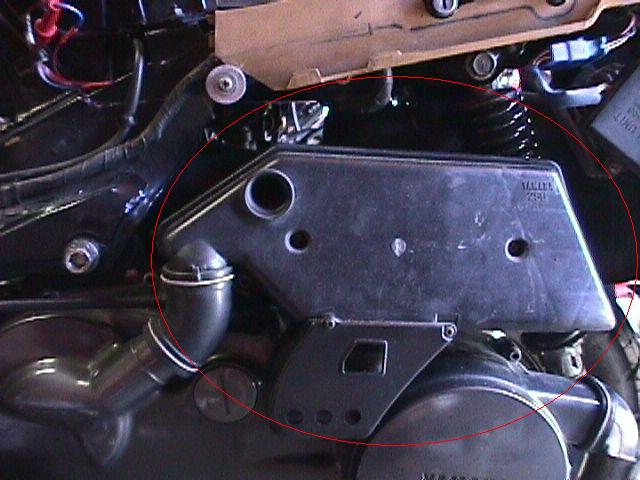
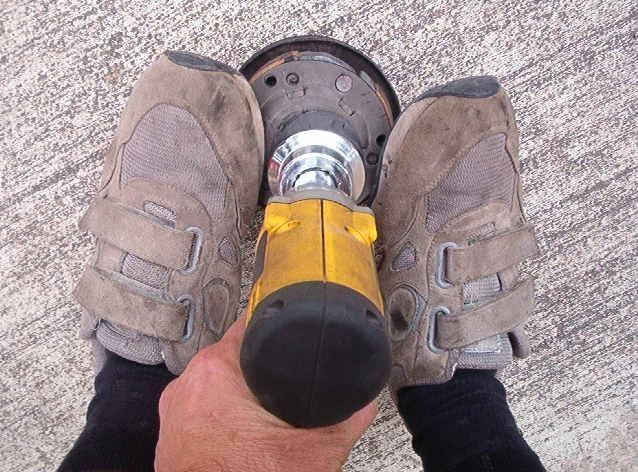
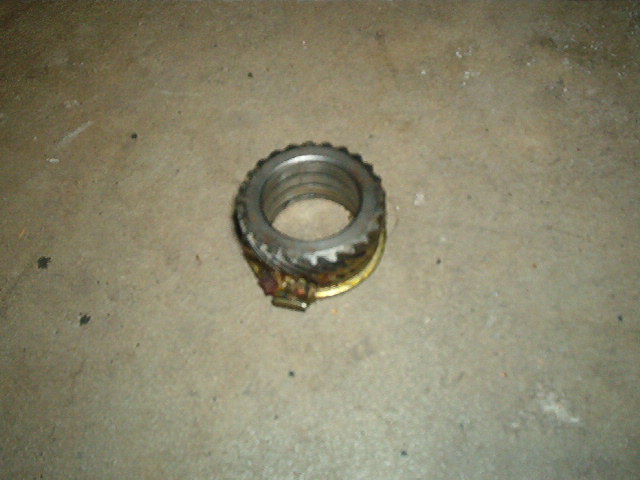
This is the part in the engine (usually located under a case on the RH side of the engine) that rotates to generate electrical power when the engine is running. It is a flywheel with a few strong magnets inside. Removing it is a snap with an impact wrench and the proper flywheel puller. If you don't have an impact wrench, use a strap wrench or a flywheel holding tool to hold the flywheel as you remove the flywheel nut. Then take a rubber mallet or a piece of 2 X 4 and wap the wrench. That impact action will loosen the nut. You'll really have a hard time if you just try to twist the nut loose. If you don't have the proper flywheel puller, you should be able to get the flywheel off with a good fitting gear puller. If the puller doesn't fit well, you risk damaging the flywheel. Once you have the bearing out, you can take it to the local bearing supply house. They will be able to match the numbers on the bearing to a suitable replacement part. Most of the new bearings seem to be double sealed (the bearing has dust covers on both side). The OEM bearings are usually sealed on only one side, or not sealed at all. The seal serves to keep dust and dirt out of the inner workings. All three types fit the same. When installing the bearing, it helps to put it in the freezer for a few hours. It will contract a bit and allow for an easier install.

General electrical information

Underneath the rotor is the stator and usually a pulse generator. The stator consists of a few coils of wire. The spinning magnets in the flywheel interact with the coils to generate A/C current. The current then flows to a rectifier, which convers it to useable D/C current. Most rectifiers also act as regulators. The regulator will control how much current flows to the battery. At high engine speeds and low electrical loads, more current will be generated than can be used. Usually excess current flows to the battery to recharge it, but too much current will wreck the battery. In this case, the regulator will re-route the current to ground.

The pulse generator creates a small pulse of current, which is sent to the black box (ignitor). The ignitor controls the timing of the signal and sends it on to the ignition coil. The ignition coil converts this small flow of electricity into a large spark that is generated at the spark plug.

The starting circuit consists of the starter switch on the handlebar, the kill switch on the handlebar, the brake switch (usually the rear brake), the starter solenoid, and the starter. When you turn on the key and press the starter switch, a 12V signal will be sent to the solenoid assuming the starting circuit is complete. It will only be complete if the kill switch is set in the "Run" position, you have depressed the brake, and you have the sidestand up (on some scooters). The solenoid is merely an electrical switch that handles the large amount of current needed by the starter. It has two little terminal connections and two big ones. Apply 12V to the two little connections, and the solenoid will complete the circuit between the big terminals. Usually there is an audible click when this happens. The completed circuit between the big terminals will route power directly from the battery to the starter.

Is my engine worn out?

The first question is - how long do scooters engines last? That's kind of a tough question. How long do automobile engines last? The answer of course is that it varies by size of engine, how hard you ride the scooter, how well you maintain the scooter, and how well the manufacturer made the engine. It could last anywhere from 5,000 miles to over 100,000 miles (in the case of well maintained Helix engines, for instance). Smaller engines like 50's and 80's have to work harder, and they run at higher RPM's to get around. So they will wear out faster. In two stroke engines, the piston and cylinder have to do more work. So the pistons wear out sooner. In four strokes, you have to worry about both the piston and the valves.

Regular and frequent oil changes with a high quality oil will go a long ways toward making your engine last. Periodic valve adjustments and air cleaner replacement/cleaning are also important. Lastly, don't forget to change the spark plug at the required intervals.

So what exactly wears out in the engine? In two strokes, the piston and cylinder will wear. They also wear in four strokes, just not as quickly. As the wear occurs, combustion gases will leak by the piston and piston rings. Oil from the crankcase will also leak by, and be burned up along with the fuel. This oil burning process depletes your oil supply and leads to a bit more pollution. Worn valves also allow combustion gases to go where they aren't supposed to go. The fuel/air mixture is not drawn completely into the combustion chamber, and exhaust gases are not completely withdrawn. This leads to starting difficulties, poor idle, and sluggish performance which will get worse over time.

A great test of an engine's health is the engine compression. An engine is really just an air pump. When it starts wearing out, it doesn't pump as well. When an engine is new, compression could run anywhere between 100 psi - 200 psi. Two strokes will have lower engine compression because they have lower compression ratios than four strokes. For instance, say a two stroke has a compression ratio of 7:1. This means the volume at the top of the piston stroke is 1/7 the volume at the bottom of the stroke. If you multiply 7 times the atmospheric pressure of 14.7 psi, you get an engine compression of 102.9 psi. So allowing a bit for losses (after all the seals aren't perfect in the engine), 100 psi is a good number. A four stroke with 13:1 compression should ideall have 191 psi on engine compression. Be sure and check compression on a warm engine with the throttle held wide open, so you can get the best reading.

Besides the piston/cylinder/valves, the parts that wear are the bearings. This includes the main bearings on the crank (these are either plain bearings or roller bearings - roller bearings are better) and rod bearings on the top and bottom of the rod. Two stroke scooters also have crank seals that must be in good shape. Depending on the wear and the quality of the components, some or all of these things must be replaced. For instance the big Yamaha scooters have very good quality main bearings. As the engine ages, you should be able to get away with just doing a top end job. This means you don't have to take the engine completely apart and replace the bearings. You should be able to get away with resurfacing the valves and replacing the piston (after a re-bore job).

Carb function

A carburetor is a complicated device that performs a simple function - delivering the correct fuel / air ratio to the engine. Your carb mixes fuel with air in a precise ratio over a wide range of throttle and engine temperature settings.
Carburetor jets are calibrated orifices that take the form of parts such as pilot (slow) jet, pilot air screw, throttle valve/slide, jet needle, needle jet, air jets, and main jet. Fuel jets have matching air jets. If an air jet gets clogged, the fuel jet will not be able to flow fuel because it cannot create a vacuum to draw the fuel. Fuel jets are available in many sizes to fine-tune the air-fuel mixture to the optimum ratio. The jets and the passageways are tiny! Just a small amount of water, dirt or old gummed-up fuel can get trapped in the tiny passages of the carb and cause havoc with jetting or even lead to engine damage. In most cases, you'll have to disassemble the carb to clean it properly. Spraying carb cleaner into the airbox just will not clear the passages properly. Sometimes you will have to run a wire or a small drill bit (being careful not to damage the jet) through the jet to clean it.
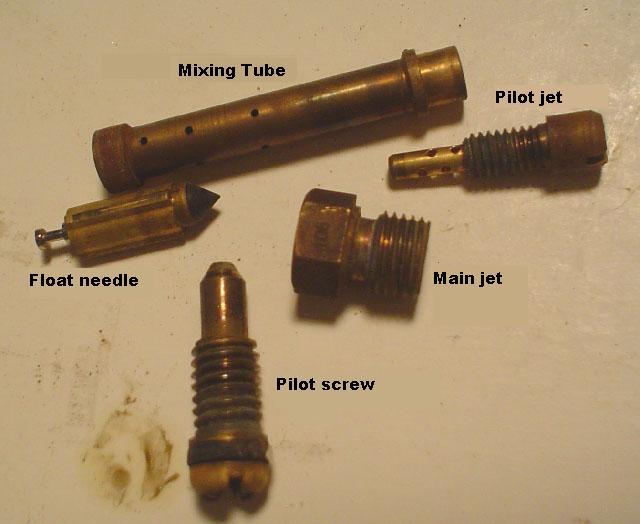
Three circuits control air flow: the air-screw, the throttle slide, and the air jets. Four circuits control the fuel: the pilot/slow jet, the needle jet, the jet needle, and the main jet. The different air and fuel circuits change the carb jetting for the different throttle-opening positions as follows:
  1. Closed to 1/8 throttle - air screw and pilot/slow jet
  2. 1/8 to 1/4 throttle - air-screw, pilot/slow jet, and throttle slide
  3. 1/4 to 1/2 throttle - throttle slide and jet needle
  4. 1/2 to fully open - jet needle, needle jet, main jet, and air jet
  5. Fully open - main jet
(Note: On many modern carbs the needle jet and air jets are fixed-diameter passages in the carburetor body and cannot be altered.)

Tuning for performance

Because of the volume of information I would like to present, this section will eventually have its own web page.

The tuning of a scooter as it comes from the factory is based on a series of compromises. The idea is to have the engine run as well as possible over a wide operating range. This is based on the stock setup: carb, air cleaner, exhaust pipe, and an unmodified engine. If you change any of these things, it can have a negative effect on performance. The scooter is tuned to work best under normal operating conditions, while still meeting the general EPA requirements of running as lean as possible. It may or may not work best for your climate and altitude. It also may not be set up to perform best for your riding style (do you want performance or economy?), scooter loading (what is the average load on thex scooter?), and riding conditions (do you do a lot of hill climbing?).

The ideal fuel - air ratio is about 12.5 : 1 for a two-stroke engine and 14.7 : 1 for a four stroke engine. The ratio varies slightly (an engine will run with a fuel - air ratio anywhere between a lean ratio like 22 : 1 to a rich ration like 8:1), depending on the chemical makeup of the fuel and a few other factors. The ratio is by weight, meaning that you need 12.5 lbs of air for every lb of fuel.

Air weighs approximately .076 lbs per cubic foot at sea level, and gasoline weighs approximately 47 lbs per cubic foot. At an air fuel ratio of 14.7 : 1, you will need over 9,000 gallons of air for every gallon of fuel that you burn. When you look at it that way, it becomes obvious that the power output of an internal combustion engine is limited by the amount of air that it can ingest. An engine is basically an air pump. In determining engine performance, airflow is the critical component!

Getting enough fuel into an engine is not a problem, because fuel is much more dense than air. Along with the fuel, we need an appropriate amount of air to go with it. Filling the chamber with air at 9000 rpm is quite a task, because we only have 5 thousandths of one second to do so. Even at idle, the intake cycle only lasts 6 hundredths of a second!

The flow passages must have very efficient if we are to get a reasonable amount of air into the engine in the given time. Filling the engine chambers with air and fuel is not a simple thing, and it is somewhat complicated by the fact that we cannot see, feel, smell, or even guess how efficient our flow path is. Luckily, we have a device called a flowbench which will tell us exactly how efficient our flow path is. Without this tool, you are left to a great deal of guesswork and trial and error.

The airbox, air filter, carb, intake passages, piston, valves (4 stroke), cams (4 stroke), cylinder porting (2 stroke), piston porting (2 stroke, if applicable), and exhaust pipe all work very closely together to move air efficiently through the engine. Changing one component effects everything else. For instance, say you replace your "restrictive" airbox with one that flows more air. If you make no other changes to the above mentioned compenents, your scooter will probably run worse. Sure, the carb picks up more air now. But you have not increased the size of the carb, nor increased the size of the jets in the carb. You are probably getting more air through the carb, but you have made the fuel / air ratio out of wack because you are getting more air without a corresponding increase in fuel flow.

Ok, so you added a less restrictive airbox and increased the size of the main jet. How did you know how much to increase the jet size? Did you use a dyno and an exhaust gas analyzer to check for more horsepower and efficient combustion? Or did you use trial and error? Since you only changed the main jet, your scooter may run better at 1/2 to full throttle because engine operation here is controlled by the main jet. But now you could have introduced problems like hard starting or rough running at low throttle settings, and poor fuel mileage.

See how difficult this is? Even if you get the carb jetted properly for the new air box, the intake passageways, combustion chamber shape, valve size and exhaust pipe size may not be able to handle the increased volume of fuel / air. The engine may run rich. Ideally your spark plug should be toasty brown. It will be black when the engine is running rich. If, say, you increase the size of the exhaust pipe or change its length, your scooter may run lean (too much air for the amount of fuel). The spark plug would be white. This is bad. A lean engine may run better... for a while. But combustion chamber temperatures will increase, which could lead to a melted piston.

I'm not saying not to do it, but please be aware of what you are getting into. It may be easiest to buy a performance kit, consisting of a carb, airbox, and exhaust pipe that are all made to work with each other.

I have not even begun to discuss intake passage grinding, cylinder head porting, high compression pistons, raising the compression ratio, high lift/duration cams, and exhaust pipe customization. Most of these topics are beyond the scope of the information I would like to present here, but I will add a bit more information. Grinding and porting work takes a lot of experience. In many cases, it is quite possible to enlarge a passage and make it flow worse! You cannot tell unless you use a flowbench to test the part. Adding a high compression piston or raising the compression ratio are pretty easy to do. They will increase your combustion efficiency and they should not effect your reliabilty or have any other negative effects. You may have to use higher octane gas to prevent detonation. Your exhaust pipe is designed to work decently over the entire operating range of your engine. It will be optimized to work best over a somewhat narrow range - say around 1/2 throttle. The exhaust pipe's job is to help scavange the burned mixture out of the combustion chamber. The length and diameter of the pipe can be changed to make it work better at lower or higher RPM.

Clutch disassembly

There is some energy stored in the large spring behind the clutch, but it can be disassembled without too much trouble or safety risk. My technique is:
  1. Remove the clutch (a powerful impact wrench works great to get the nut off). If you can't beg or borrow an impact, use a strap wrench or clutch holding tool. Then take a rubber mallet or a piece of 2 X 4 and wap the wrench. That impact action will loosen the nut. You'll really have a hard time if you just try to twist the nut loose.
  2. Place the clutch unit on a rag on the ground.
  3. Place your feet on each side of the clutch, leaving room to access the nut. You don't need your full body weight on the clutch but you should have a fair amout of weight on it.
  4. Remove the nut with the appropriate sized socked (very tough to do without an impact wrench).
  5. Slowly lift your feet and then use your hands to push on the spring to let it expand slowly.
  6. The clutch assembly will come apart with no problem.
There are special clutch hub holders on the market that make this job easier (if needed).

General electrical problem diagnosis

When you're faced with a problem, try to narrow down when it occurs. Most often, the wiring itself is probably ok. Under rare conditions, a wire will become chafed by rubbing against the frame or a sharp corner. Most often the problems occur at the wiring connections. The connections can come loose or get corroded.

For instance, say your horn just stopped working. It is probably a bad horn or a dirty horn switch. I try to start with the easiest thing to check. In this case I would first test the horn to see if it's working. Unhook both of the wires going to the horn and apply 12V (or 6V if you have a 6V system) directly to the horn terminals. Does the horn work? If so, check the condition of the terminals on the horn and on the wires leading to the horn. Are the clean and shiny, or 
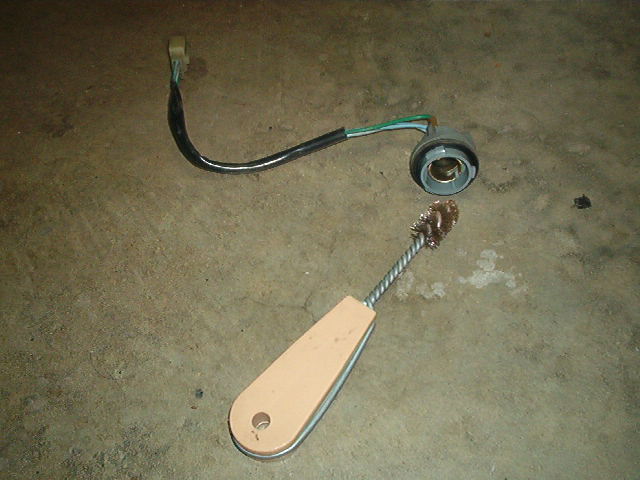
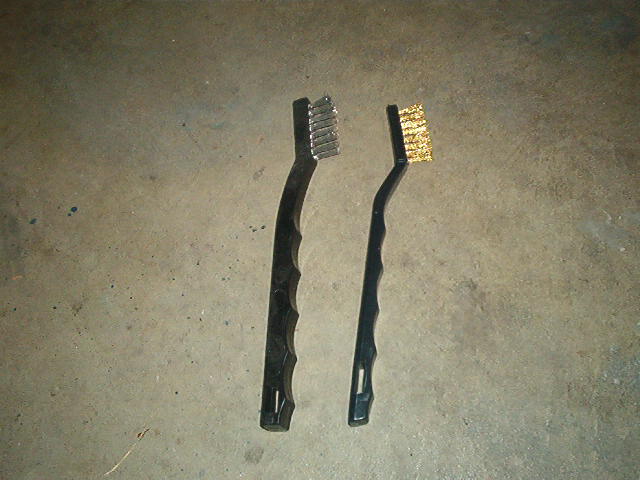
dull and dirty? A small wire brush will clean them in no time. Next, I would take apart the horn switch Are the contacts clean? Even if they're clean, I work clean them with contact cleaner and a brass brush (see the next tip below). Turn on the key and connect the wires together. Does the horn work? If the horn still doesn't work, you'll have to trace the wires. Look for corroded or broken connections.

Blinkers not working

If only the left or right side blinkers aren't working, it is most likely a problem with a bulb. The blinker relay needs the resistance of both light bulbs to work properly. If only one bulb is lighting up, check the other bulb to see if it is bad, or badly corroded. A corroded bulb can be cleaned with a wire brush. A corroded light bulb socket can be cleaned very nicely with a 1/2" copper pipe cleaning brush , found at your local hardware store. If neither side works, suspect a dirty blinker switch or a bad blinker relay. Check for 12V going into the blinker relay. The relay is the part that actually makes the blinkers blink. On the older (mid 80's scooters) it is generally a mechanical device. On newer scooters it is generally an electronic device, which is more reliable and less subject to corrosion. On the mechancial relays, there is an electromagnetic switch and a cantilevered wire. The wire heats up as current flows through it and it bends, breaking contact with the circuit. This turns the blinkers off. Then it cools and moves back, making contact and completing the circuit again. The relays get corroded and stop working over time. Replace the relay with a new one. If you don't care about getting the stock relay, a good and inexpensive replacement part can be found at your local auto supply store. If you have sufficient voltage going into the relay, then it's probably bad. If you don't, then check your blinker switch. You can clean the switch as per the instructions below.

Electrical gremlins in your switches

Blinkers suddenly not working? Starter switch not working? More often than now, these problems can be traced to gummed up or dirty switches. Over a numbers of years, dirt and crud get into the electrical contacts and prevent them from working. The cure is a bit time consuming, but not difficult. A quick and dirty fix is to spray a bunch of electrical cleaner into the switch while you work it back & forth. This may solve the problem, but in general you'll have to disassemble and clean the
switch The fairing / speedo area will have to be disassembled enough for you to get the switches out. Once you have the switches out, you'll find several wires, springs, ball bearings, and electrical contacts inside. Be sure and note how these parts are put together so that they can be reassembled properly. Carefully disassemble each switch in turn. Ideally, you would do the work over a blanket or a large rag to help prevent lost parts. Clean the copper contacts with electrical contact cleaner and a small brush. It is best to use a brass brush because it is softer than a wire brush and won't damage the contacts. I use a small dab of dielectric grease (available and any auto store) to ensure the moving parts slide smoothly. Upon reassembly, you'll be pleasantly surprised how nicely the switches work!

Light bulbs

The common sizes on 12V scooters are:

Use

SAE number

Voltage

Wattage

Combination brake / tail light (two filament bulb) 1157 12 27 / 8
Turn signal 1156 12 21
Turn signal (slightly brighter) 1034 12 23
License plate light 158 12 8
Instrument panel 194 12 5
High beam indicator, oil light indicator, etc. 158 12 3.4
Combination brake / tail light (two filament bulb) 1154 6 21 / 5
Turn Signal 1129 6 21
High beam indicator, oil light indicator, etc. 63 6 8

The SAE number is from the Society of Automotive Engineers, and is just a standard designation for the bulb. You can find most of these bulbs at your local auto or motorcycle shop, by the SAE number. In a pinch, you can use a 12V bulb in place of a 6V bulb. It won't burn as bright, but it will work (and it will last longer). If you put a 6V bulb in where a 12V bulb is needed, the 6V bulb will burn very brightly for a minutes and then it will burn out.

So, you'd like to put in brighter bulbs? And you would especially like to replace that 50 watt bulb headlight with a 100 watt bulb? In general assuming light bulbs with the same efficiency, the brighter bulbs require more power. This can be a problem if the wattage is too high. It creates two problems 1) the greater heat of the higher wattage bulb can melt the bulb fixture or the wiring 2) the higher load may overwhelm your charging system and end up draining the battery when you ride. Quite a few scooters (especially the 50's) have charging systems that are just barely adequate. If you have a 50, you may notice the lights are dim at idle. The lights brighten as you rev the scooter because the charging system puts out more amperage. In cases like this, the battery is being drained at idle because the charging system is not putting out enough power to cover the power needs of the scooter. As a side note, the charging system draws a bit of power from the engine. If you have higher wattage lights (or you add a radio or something), your engine will have to work a bit harder to supply the needed current.

You have to be careful when replacing a standard incandescent bulb with a halogen bulb. While the halogen bulb is more efficient (you get more light for the same wattage), it gets much hotter due to the nature of the bulb. It might melt your fixture and the surrounding plastic in a big hurry. A good alternative that is just coming on the market are the super bright LEDs. These little lights consume very little power and are very bright for their size. They will last 10 years or more - over 5 times as long as a regular bulb. They also produce very little heat and they light up quicker. This is a nice safety feature when used in your brake light, allowing the traffic behind you to see your brake light is on a little sooner than with a standard bulb. Packing 5 to 40 or more LEDs in a bulb makes it bright. The only downside is that they are still expensive - around $10 to $25 for the best bulbs.

Broken speedometer

So your speeo doesn't work? Here are the likely culprits, in order of occurence:
  1. Broken speedometer cable
  2. Sheared off drive_gear in the front wheel
  3. Loose speedometer cable
  4. Stripped gears in the front wheel
  5. Bad speedometer
Most of the time the problem is a broken speedometer cable. They tend to rust out and break near the front wheel. This is due to water exposure and a lack of lubrication. The somewhat tight bend of the speedo cable at the wheel doesn't help, either. There are a few ways to check out the speedo cable. Remove the cable at the front wheel. Can you get to the inner speedo cable? The cable is in two separate parts - the inner cable and the outer cable. Try to fish out the inner cable and pull it out a foot or so. Is it complete, or broken? If it looks ok, pull it all the way out. Did it come out in one piece? You can tell because the very end of the cable will be squared off as it enters the speedometer. If the cable is ok, put a little grease on it and reassemble the cable. Next, spin the front wheel and watch to see if the speedo drive in the wheel is moving. If it doesn't move, you either have sheared off pins or stripped gears. Some of these parts are replaceable. If the drive unit is ok, reattach the cable to the wheel. Make sure you have reattached it properly. Disconnect the cable from the speedometer and spin the front wheel. You should see the end of the cable moving. If the speedometer still doesn't work after proper reattachment of the cable, then the speedo itself will need attention. Sometimes they get gummed up after years of sitting around. See if the parts will move by hand. If not, try disassembling the speedometer and spraying some lube into the back of the cable hookup.

Steering head bearings

Most scooters use loose ball bearings in the steering head. Smaller scooters (50's and 80's) tend to use 5/32" bearings. Larger scooters use 3/16" bearings in the top of the steering head and 1/4" bearings on the bottom (this is where most of the weight is carried). If your front end wobbles upon deceleration, then all the steering head probably needs is a little tightening. If the front end does not move smoothly as you turn the bars, or if it feels stiff and "notchy", you'll probably need to disassemble and repack or replace the bearings. The good news is that these ball bearings are very inexpensive and easy to find at your local well stocked hardware store.

Sticking brake levers

Most of the time the problem is either the brake cable or the brake pivot at the brake hub. Loosen the brake cable adjuster at the brake arm on the hub. Try to move the arm by hand. If it moves freely, your cable is bad. If it doesn't move, you'll need to disassemble the hub and grease the pivot.

Sometimes you can bring a sticking or rusted brake cable back to life. Remove the cable and gently place it in a vise vertically, with the end of the cable at the wheel facing up. This end of the cable picks up dirt and water from the road. Does the cable move at all? If not, you are definitely better off just replacing the cable. They are less than $20 in most cases. I have never been able to fix a badly rusted cable. Start dripping some light motor oil in the joint between the inner and outer cables. Work the cable back and forth while you do this. It's a tedious process. Try it for 10 - 15 minutes and see if the cable is working any better. If so, you might be able to salvage it. The easiest way to fully lube the cable is to tape a small bag just below the joint. Fill the bag with some motor oil and let it sit for a day or so. You should see some oil dripping out the bottom of the cable.

Other possible causes are: broken brake spring, badly rusted brake hub and brake shoes, a misrouted cable, or a dirty brake perch (the thing that holds the brake lever to the handlebar).

Plastic repair

Just about every used scooter I have ever owned (probably around 100 of them) has had cracked body plastic somewhere on the scooter. Body plastic is made of different types of materials - ABS, PVC, etc. Repairs can be made using fiberglass repair kits, bondo, various glues, and by plastic welding. The fiberglass repair kits are quite strong, and will work well on all types of plastic except ABS. ABS is generally too flexible so the repair will not hold.

I have done a fair amount of scooter plastic painting, generally with good results. By far, the most part of the project is in the prep work. Take your time here. After all, the paint is only a few thousands of on inch thick. It simply will not hide deep scratches, cracks, or a poor repair. Use good quality paint for best results. A spray can paint job can give ok results, but it works best on small jobs. The results are pretty poor if you want to paint something large like a side panel. The so-so quality of the paint combined with the crummy spray pattern of the plastic spray nozzle just will not produce good results. I use professional auto paints along with a spray gun for best results. This will produce a paint job that can equal the factory paint job.

Here are some quick tips:

Fuel petcock

This is the thing that controls the flow of fuel from the gas tank to the carb. Most of the time, it is located on the underside of the gas tank. This used to be a lever that you would have to manually turn on and off. If you forget to turn it on, your scooter will die after a short distance. Virtually all modern scooters have a petcock that works automatically. It is controlled by a vacuum line that attaches to the carb or the intake manifold. When the engine is spinning, a vacuum is drawn on the line. This will move a rubber diaphram in the petcock, and allow fuel to flow through the petcock. As soon as the engine stops spinning, the vacuum will stop. Then the fuel flow stops. Cool, huh? As petcocks age, they can stop working. In order for the petcock to work properly, it must do at least 3 things:
  1. Fuel must flow when vacuum is applied
  2. Fuel must stop flow when vacuum is applied
  3. Fuel should not flow from the vacuum connection into the engine
You can test the petcock to make sure it is working. It is easiest to test it when it is still connected to the gas tank. There should be two hoses running to the petcock. About 99% of the time, the smaller line is the vacuum line and the larger line is the fuel line. The fuel line will connect to the lower middle part of the carb. The vacuum line will connect to the intake manifold (between the carb and the engine) or to the back part of the carb. Disconnect both lines. Run the fuel line into a small container to catch the gas. Draw a vacuum on the vacuum line. You can do this with a vacuum tool or by mouth. As soon as the vacuum is drawn, fuel should flow. If not, you have either a bad petcock, a clogged filter screen in the gas tank, a cracked vacuum hose, or a clogged fuel line. Assuming gas flows, stop the vacuum. Fuel should stop flowing. Try this test a few times to make sure it is working properly. The petcock should be able to hold the vacuum and not leak. If it doesn't hold the vacuum it will probably need replacing soon.

Sticking throttle cables

Throttle cables are not subject to the same weather abuse as brake cables (as noted above). They usually stick because of a worn cable, binding throttle housing, misrouted cable, or a stuck carb (either a stuck vacuum piston or throttle cutaway, depending on the type of carb).

Rusty gas tanks

There are several ways to clean your tank. First, I'd try to determine how badly the tank is rusted. Is it just surface rust? You might be able to just live with the rust if it is light. Or is it really bad (pin holes allowing gas to leak out of the tank)? If it's really bad, you might want to just replace the tank. Pinholes can be repaired with the products mentioned below, but it's a fair amout of work.

In a nutshell, you can remove the tank and:
The best way to prevent rusting in the future is to keep your tank full of gas. The rusting occurs in an empty tank when water condenses out of the atmosphere and settles in your tank. This can't happen if the tank is full of gas.

My scooter won't start or has poor performance

I get this question a lot. It could be many things. First, ask yourself: Whether you can fix the problem yourself depends a lot on your level of mechancial expertise. How comfortable are you weilding a wrench? My explanations assume some level of familiarity, because it is very difficult to cover every last detail. Your best bet is to purchase a service manual or take it to the shop if you feel your skills aren't up to the task. Here is a paritial list of what can go wrong:
  1. Low compression (due to worn piston, piston rings, and/or worn or misadjusted valves on 4 strokes)
  2. Loose spark plug wire (happened to me once on an Elite 150)
  3. Loose / chafed wire somewhere
  4. Ignitor box may be going out (they usually start to fail in high demand situations, like sudden acceleration or hill climbing)
  5. Cracked / loose carb boot (between the carb and the air cleaner) or carb manifold (between the carb and the engine).
  6. Cracked vacuum line somewhere
  7. Bad gas, or dirt / contamination in the fuel line
  8. Failing petcock
  9. Missing air cleaner air cleaner
  10. Dirty or missing air cleaner air cleaner element
  11. Clutch slipping
  12. Worn drive belt
  13. Worn variator weights

Tire maintenance

Maintaining your tires is important. They are the only thing holding your scooter to the road. To give you an idea of their importance, imagine you had no tires and you had to ride you scooter on its rims. Braking and cornering would be almost impossible - just trying to ride it would be difficult enough.

Regular inspection and maintenance are important. You should inspect your tires once a week for wear, cracks, and proper inflation. This should only take maybe 30 seconds per tire. Are the tires wearing evenly? If not you could have a misalignment problem or improper inflation level. You can get the proper inflation level from your owner's manual or service manual. I have inflation levels for quite a few scooters on
this web page. Look for damage from glass, nails, etc. Check the sidewalls for cracks. Replace the tires if the sidewall cracks get bad.

Are the tires holding air from week to week? Is one tire losing air faster than the other one? It could be one of 4 problems: A puncture in the tread can usually be fixed if it's not too bad. If you have a puncture or a slit in the sidewall, the tire must be replaced.

Tools

This is a fun subject for me. I like having the right tool for the job. It makes things go faster, easier, and much more enjoyable. My dad taught me to buy QUALITY tools. They look better, feel better, do a better job, and last longer! I have a few seldom-used tools that are cheap and made in China. Not to start a fight or anything, but most of the stuff from China is not good quality. It's like the Japanese stuff we used to get in the 60's (yea I remember back that far). Hopefully it will improve. The design is ok, but the quality of the materials is generally poor. Also fit and finish are poor, as are the manufacturing tolerances. So they are not enjoyable to use and they don't work as well as quality tools. Stick with the quality brands and you will never be disappointed. There are so many Chinese and other poor quality brands that they cannot all be named. Try to use price as your guide. If it's not a quality brand and if you can get a 50 piece socket set for $10, you don't want it :>)

What are the quality brands? I'm sure I will miss one, but here goes: Craftsman, Mac, Proto, S-K, GearWrench, Xcelite, and especially Snap-On. I love Snap-On tools - they are superb in every way. What I don't like are the very high prices. How about $20 for a screwdriver? $30 for one socket? I bought most of my Snap-On tools years ago when they were cheaper. Now if I need a cool new tool, I try to find a new or gently used item on ebay.

You should be able to outfit yourself with a good starer set for $100 or less. This is less than 2 hours of shop time when you take your scooter into the shop. Here is an attempt at a list of basic tools:
  1. 3/8" socket set (10mm - 19mm sockets, socket wrench, and a few different sized extensions)
  2. 8mm - 22mm wrenches - either open end or combination
  3. 12" cresent wrench for those bigger nuts
  4. Hammer, along with a few pin punches and cold chisels
  5. Standard and needle nose pliers
  6. Channel lock pliers
  7. Wire cutters
  8. Vise grip pliers (the all purpose tool! Be sure to get a good brand like Vice Grip or Craftsman)
  9. 3mm - 8mm allen wrenches
  10. Assorted #1, #2, #3 phillips screwdrivers and a few flat blade screwdrivers
  11. Impact wrench (a hand impact is about $20, an electric or air impact will be more expensive)
Most scooter fasteners are either 8mm, 10mm, 12mm, 14mm, 17mm, 19mm, 22mm, or 24mm. Sometimes you will also find 7mm, 13mm, 15mm, or even 32mm, 36mm, 38mm or 41mm fasteners. Most phillips screws are either #2 or #3. There are a few #1 phillips screws in the electrical switches and the clock battery covers. Always use the biggest screwdriver that will fit. Most factory screws are pretty soft, and will get stripped pretty easily if you are not careful or if you use poor quality ill fitting screwdrivers. I have never really understood why manufacturers continue to use such a poor design as the phillips screw. Even when using good quality screwdrivers, the soft phillips screws can strip out (or cam out) and wreck the screw. An excellent alternative to screwdrivers is a cordless or air powered impact wrench. They are very fast and work great. I very rarely have stripping problems when I use one. I have heard that manufacturers use these crummy screws on purpose so that you can't overtorque them. Really? So what logic is applied to bolts, which can be overtorqued? I think they mainly do it to save money (probably no more than $2 per scooter). A good option is to replace these screws with good quality allen head or torix drive screws. Here is a general breakdown of fastener applications:

Torque settings for fasteners

Undertorquing and overtorquing are both bad. The problem with Undertorquing is obvious - you're going to loose that nut or bolt because it wasn't tightened enough.

Overtorquing causes its own problems. For instance, when a locking nut is tightened, the bolt the shaft actually stretches a bit. The resulting tension holds the locking nut in place. When the nut is removed, the bolt springs back to its original length. Overtorquing stretches the bolt, causing an undetected "yield" that may result in broken threads. The bolt also gets permanently stretched, reducing the clamping forces. Subsequent removal / install of the nut can exacerbate the problem. Pretty soon, the nut won't hold at all no matter how tight you make it.

There are a few factors that go into the torque output of an impact wrench: The owners manual of my impact wrench gives a torque range that you can get when holding the trigger down for 1 second, 2 seconds, and so on. My impact wrench is rated at ~100 ft-lbs max. I'd never use a tool rated above ~150 ft-lbs to install fasteners on a motorcycle. There is too much chance of damage.

So, what does it all mean? I have taken the figures from the owners manual and experimented with the torque settings for a given socket and nut combination. I know that to get 40-50 ft-lbs on a particular nut, I need to hold down the trigger for 4 seconds. This method gets really close and it's fast. But I use a torque wrench most of the time, especially when tightening anything under ~30 ft-lbs.

Two-stroke tuneups

With no valves to worry about, tuning up a two-stroke is very easy. Just replace the spark plug :>) The spark plug is more critical to good operation in a two stroke, and they tend to wear out faster. I'd replace them every 2000-3000 miles. Also, be certain that you are using the proper injection oil! Do not use automobile oil - you'll ruin the engine. It must be oil that is specifically designed for two-strokes. The bottle should say something like "for 2 cycle oil injection" (two cycle and two-stroke mean the same thing). If you don't have oil injection, but sure to properly pre-mix your oil and gasoline. I've done this for years with dirt bikes. It's a bit of a pain, but not difficult.

Over time, the exhaust pipe can get clogged up with oil and carbon residue. It will happen less frequently if you use a good quality injector oil. Here are some ways to unplug the exhaust pipe (in order of difficulty):

  1. Drill a hole (~3/8") from the rear of the muffler through the exhaust outlet
  2. Drill a few holes (~1/4") into the muffler from the side of the muffler. The closer you drill the holes the the front of the muffler (near the header pipe), the more open (and louder) you will make the muffler.
  3. Remove the muffler and put over cleaner inside. Shake it around, then let sit and drain.
  4. Remove the muffler and heat it up with a propane torch until it stops smoking. Or throw it in a wood fire for ~30 minutes or so. This will burn up the oil deposits and turn them to ash, which will blow out when you start the scooter.
  5. Cut it open with a cutoff tool. Clean out the baffles with a wire brush and weld it back together.

© Copyright 2002-2014 by Jack Stanley.  All Rights Reserved.